DS 3: Spare wheel / Fitting a wheel
 Fitting a steel or
"space-saver" type spare
wheel
Fitting a steel or
"space-saver" type spare
wheel
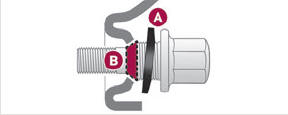
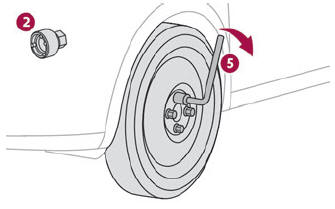
If the vehicle is fitted with alloy wheels, the washers A do not make contact with the steel or "space-saver" type spare wheel. The wheel is held in place by the conical contact surface B of each bolt.
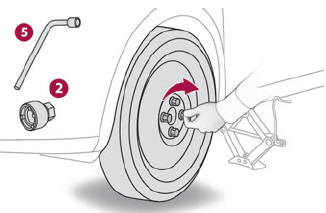
- Fit the wheel on the hub.
- Screw in the bolts by hand as far as possible.
- Pre-tighten the security bolt using the wheelbrace 5 equipped with a security socket 2.
- Pre-tighten the other bolts using the wheelbrace 5 only.
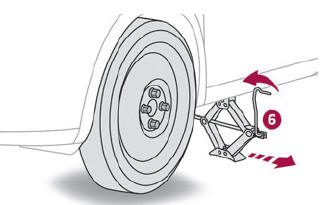
- Lower the vehicle again fully.
- Fold jack 6 and remove it.
- Tighten the security bolt using the wheelbrace 5 equipped with a security socket 2.
- Tighten the other bolts using the wheelbrace 5 only.
- Refit the bolt covers to each of the bolts (depending on equipment).
- Store the tools.
After changing a wheel
 With a
"space-saver" type spare wheel
With a
"space-saver" type spare wheel
Deactivate certain driving aid functions (Active Safety Brake, Adaptive Cruise Control, etc.).
Do not exceed the maximum authorised speed of 50 mph (80 km/h).
Driving with more than one "space-saver" type spare wheel is prohibited.
 Go to a dealer or a
qualified workshop.
Have the tightening of the spare wheel's
bolts and its tyre pressure checked.
Go to a dealer or a
qualified workshop.
Have the tightening of the spare wheel's
bolts and its tyre pressure checked.
Have the punctured tyre examined. After inspection, the technician will advise you on whether the tyre can be repaired or if it must be replaced.
 Removing a wheel
Parking
the vehicle
Immobilise the vehicle where it does not
obstruct traffic: the ground must be level,
stable and non-slippery.
With a manual gearbox, engage first gear
to lock the wheels, apply the parking brake,
unless it is set to automatic mode, and switch
off the ignition...
 Changing a bulb
In
some weather conditions (e.g. low
temperature or humidity), the presence of
misting on the internal surface of the glass of
the headlamps and rear lamps is normal; it
disappears after the lamps have been on for a
few minutes...
Other information:
DS 3 2016-2026 Owners Manual: DAB (Digital Audio Broadcasting) radio
Terrestrial Digital Radio Digital radio provides higher quality sound. The various "multiplexes/ensembles" offer a choice of radio stations organised in alphabetical order. Press Radio Media to display the main page. Press “Band …” at the top centre of the screen to display the "DAB" waveband...
DS 3 2016-2026 Owners Manual: Electric parking brake
In automatic mode, this system applies the parking brake when the engine is switched off and releases it when the vehicle moves off. At any time, with the engine running: To apply the parking brake, briefly pull the control. To release it, briefly push the control while pressing the brake pedal...
Categories
- Manuals Home
- 1st Generation DS 3 Owners Manual
- 1st Generation DS 3 Service Manual
- Boot
- Use
- Child lock
- New on site
- Most important about car
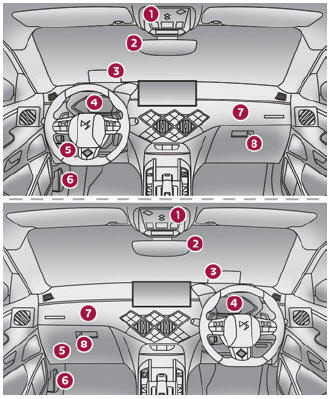
Instruments and controls
These illustrations and descriptions are provided for information only, as the locations of certain elements may vary depending on the version or trim level.