DS 3: Ease of use and comfort / Boot fittings
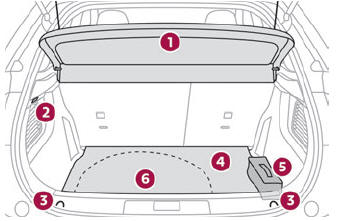
- Load space cover
- Boot lamp
- Stowing rings
- Boot mat
- Tool kit (depending on equipment)
- Storage well
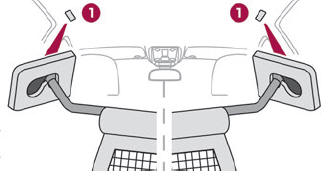
 The stowing rings are
designed to secure
luggage using different types of retaining
nets. They are used with the ISOFIX mounting
rings located behind the rear seats.
The stowing rings are
designed to secure
luggage using different types of retaining
nets. They are used with the ISOFIX mounting
rings located behind the rear seats.
The retaining nets are available as an option or as an accessory.
For more information, contact a dealer.
Load space cover
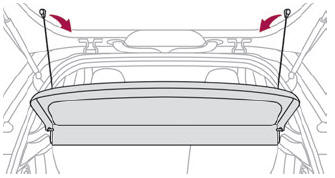
To remove the load space cover:
- unhook the two cords,
- gently lift the shelf, then remove it.
 When sharp deceleration
occurs, objects
placed on the load space cover can turn
into projectiles.
When sharp deceleration
occurs, objects
placed on the load space cover can turn
into projectiles.
Storage well
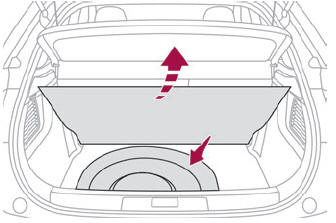
- Lift the boot carpet as far as possible to access the storage well.
Depending on version, it includes:
- A spare wheel with or without the tool kit.
- The traction battery charging cable (Electric).
High load retaining net
This removable net allows the entire load volume behind the front seats to be used up to the roof when the rear seats are folded. It offers protection to the occupants when very sharp braking occurs.
- Fold down the rear seats.
- Insert the ends of the bar, one after the other, into fixing points 1 of the roof.
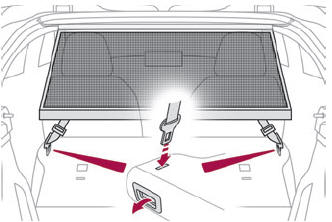
- Attach the net’s straps to the lower anchoring points, located on the fixings of the rear bench seat backrest.
- Pull on the straps to stretch the net.
Boot lamp
It comes on automatically when the boot is opened and goes off automatically when the boot is closed.
The lighting time varies according to the circumstances:
- When the ignition is off, approximately 10 minutes.
- In energy saving mode, approximately 30 seconds.
- With the engine running, unlimited.
 Touch-sensitive courtesy lamps
Front touch-sensitive courtesy lamp
Front touch-sensitive reading lamps
Rear touch-sensitive reading lamps
Front touch-sensitive courtesy lamp
It comes on gradually:
when the vehicle is unlocked...

Other information:
DS 3 2016-2026 Owners Manual: Disconnection
Before disconnecting the nozzle from the charging connector: If the vehicle is unlocked, lock it and then unlock it. If the vehicle is locked, unlock it. The red indicator lamp in the flap goes out to confirm that the charging nozzle is unlocked. Within 30 seconds, remove the charging nozzle. The charging indicator lamp comes on in white. With selective door unlocking activated, p..
DS 3 2016-2026 Owners Manual: Additional adjustments
Electric lumbar adjustment Press the + or - control to obtain the desired lumbar support. Massage function (Driver’s seat only) This function provides lumbar massage; it only operates when the engine is running as well as in STOP mode of the Stop & Start system. Activation/Deactivation Press this button to activate/ deactivate the function. Upon activation, the indicator lam..
Categories
- Manuals Home
- 1st Generation DS 3 Owners Manual
- 1st Generation DS 3 Service Manual
- Stop & Start
- Use
- Boot
- New on site
- Most important about car
Selector