DS 3: Head-up display / Selector
- Switching on
- Switching off (long press)
- Brightness adjustment
- Display height adjustment
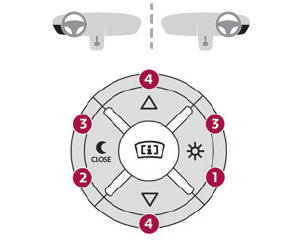
Activation/Deactivation
- With the engine running, press button 1 to activate the system and deploy the projection blade.
- Press and hold button 2 to deactivate the system and retract the projection blade. The state of the system is saved when the engine is switched off and restored on restarting.
Adjusting the height
- With the engine running, adjust the display to
the desired height using the buttons 4:
- up to move the display up,
- down to move the display down.
Brightness adjustment
- With the engine running, adjust the brightness
of the information display using the buttons 3:
- on the "sun" to increase the brightness,
- on the "moon" to decrease the brightness.
 When stationary or while
driving, no
objects should be placed around the
projection blade (or in its recess) so as not to
impede its movement and correct operation.
When stationary or while
driving, no
objects should be placed around the
projection blade (or in its recess) so as not to
impede its movement and correct operation.
 In certain extreme weather
conditions
(rain and/or snow, bright sunshine, etc.),
the head-up display may not be legible or may
suffer temporary interference.
In certain extreme weather
conditions
(rain and/or snow, bright sunshine, etc.),
the head-up display may not be legible or may
suffer temporary interference.
To clean the projection blade, use a clean, soft cloth (such as a spectacles cloth or microfibre cloth). Do not use a dry or abrasive cloth, or detergent or solvent products, due to the risk of scratching the projection blade or damaging the non-reflective coating.
 Display in operation
Once the system has been activated, the
following information is grouped together in the
head-up display:
The speed of the vehicle.
Cruise control/speed limiter information and,
if the vehicle is so equipped, the Road signs
recognition function...
 Warning and indicator lamps
Displayed as symbols, the warning and indicator
lamps inform the driver of the occurrence of a
malfunction (warning lamps) or of the operating
status of a system (operation or deactivation
indicator lamps)...
Other information:
DS 3 2016-2026 Owners Manual: Refuelling
Fuel tank capacity: approximately 44 litres (Petrol) or 41 litres (Diesel). Reserve level: approximately 6 litres. Low fuel level When the low fuel level is reached, this warning lamp lights up on the instrument panel, accompanied by the display of a message and an audible signal...
DS 3 2016-2026 Owners Manual: Digital instrument panel
This digital instrument panel can be customised. Depending on the display mode selected, certain information is hidden or presented differently. Rev counter (x 1000 rpm) (Petrol or Diesel)Power indicator (Electric) Cruise control or speed limiter settingsDisplay of speed limit signs Digital speedometer (mph or km/h) Gear with automatic gearbox (Petrol or Diesel)Drive selector position (E..
Categories
- Manuals Home
- 1st Generation DS 3 Owners Manual
- 1st Generation DS 3 Service Manual
- SCR system
- AdBlue® range indicators (BlueHDi)
- Headlamp beam height adjustment
- New on site
- Most important about car
Display in operation
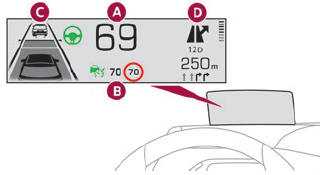
Once the system has been activated, the following information is grouped together in the head-up display:
The speed of the vehicle. Cruise control/speed limiter information and, if the vehicle is so equipped, the Road signs recognition function. If the vehicle is so equipped, inter-vehicle distance information, lane departure warning system information, lane positioning assist information, and automatic emergency braking alerts. If the vehicle is so equipped, navigation information.