DS 3: Temporary puncture repair kit / Repair procedure
 Do not remove any foreign
bodies (e.g.
nail, screw) which have penetrated into
the tyre.
Do not remove any foreign
bodies (e.g.
nail, screw) which have penetrated into
the tyre.
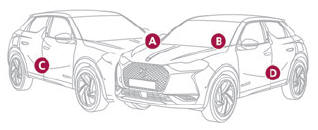
- Park the vehicle without obstructing traffic and apply the parking brake.
- Follow the safety instructions (hazard warning lamps, warning triangle, high visibility jacket, etc.) according to the legislation in force in the country in which you are driving.
- Switch the ignition off.
- Uncoil the pipe stowed under the compressor.
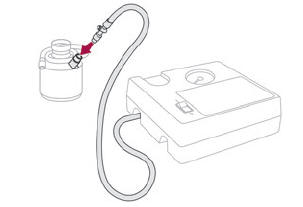
- Connect the pipe from the compressor to the bottle of sealant.
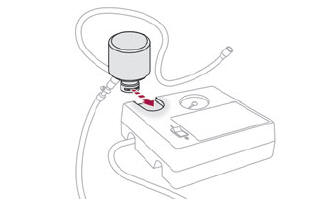
- Turn the bottle of sealant over and secure it in the notch provided on the compressor.
- Remove the valve cap from the tyre to be repaired, and place it in a clean place.
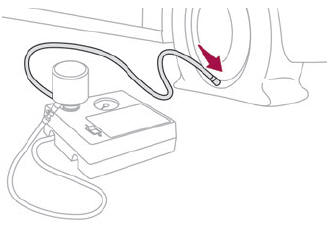
- Connect the hose from the bottle of sealant to the valve of the tyre to be repaired and tighten firmly.
- Check that the compressor switch is in position "O".
- Fully uncoil the electric cable stowed under the compressor.
- Connect the compressor's electric plug to the vehicle's 12 V socket.
 Affix the speed limit
sticker.
Affix the speed limit
sticker.
 The speed limit sticker
must be affixed
inside the vehicle in the area close to the
driver, to remind them that a wheel is in
temporary use.
The speed limit sticker
must be affixed
inside the vehicle in the area close to the
driver, to remind them that a wheel is in
temporary use.
- Switch the ignition on.

- Switch on the compressor by moving the switch to position "I" until the tyre pressure reaches 2 bar. The sealant product is injected under pressure into the tyre; do not disconnect the pipe from the valve during this operation (risk of blowback).
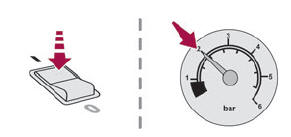
 If after approximately 7
minutes, the
pressure of 2 bar is not reached, this
indicates that the tyre is not repairable;
contact a dealer or a qualified workshop for
assistance.
If after approximately 7
minutes, the
pressure of 2 bar is not reached, this
indicates that the tyre is not repairable;
contact a dealer or a qualified workshop for
assistance.
- Move the switch to position "O".
- Disconnect the compressor's electric plug from the vehicle's 12 V socket.
- Remove the kit.
- Refit the cap on the valve.
- Remove and store the bottle of sealant.
 The sealant product is
harmful if
swallowed and causes irritation to the
eyes.
The sealant product is
harmful if
swallowed and causes irritation to the
eyes.
Keep this product out of the reach of children. The use-by date of the fluid is marked on the bottle.
After use, do not discard the bottle into the environment; take it to a dealer or an authorised waste disposal site.
Do not forget to obtain a new bottle of sealant, available from a dealer or a qualified workshop.

- Drive immediately for approximately 3 miles (5 kilometres) at reduced speed (between 12 and 37 mph (20 and 60 km/h)) to plug the puncture.
- Stop to check the repair and the tyre pressure using the kit.
 With a tyre repaired using
this type of kit,
do not exceed a speed of 50 mph
(80 km/h) and do not drive more than
125 miles (200 km).
With a tyre repaired using
this type of kit,
do not exceed a speed of 50 mph
(80 km/h) and do not drive more than
125 miles (200 km).
Contact a dealer or a qualified workshop to have the tyre changed.
 Temporary puncture repair kit
Scan the QR Code on page 3
to view
explanatory videos.
Made up of a compressor and a sealant
cartridge, it allows you to carry out a temporary
repair of the tyre so that you can drive to the
nearest garage...
 Checking/adjusting tyre pressures
The compressor can be used, without injecting
sealant, to check and, if necessary, adjust the
tyre pressures.
Remove the valve cap from the tyre and keep it
in a clean place...
Other information:
DS 3 2016-2026 Owners Manual: Localised Assistance Call
If the vehicle breaks down, press button 2 for more than 2 seconds to request assistance (confirmed by a voice message*). Pressing again immediately cancels the request. Privacy mode allows you to manage the level of sharing (data and/or location) between your vehicle and DS AUTOMOBILES...
DS 3 2016-2026 Owners Manual: Checking levels
Check all of the following levels regularly in accordance with the manufacturer's service schedule. Top them up if required, unless otherwise indicated. If a level drops significantly, have the corresponding system checked by a dealer or a qualified workshop...
Categories
- Manuals Home
- 1st Generation DS 3 Owners Manual
- 1st Generation DS 3 Service Manual
- AdBlue® range indicators (BlueHDi)
- Orange warning/indicator lamps
- Stop & Start
- New on site
- Most important about car
Identification markings
Various visible markings for vehicle identification and vehicle search.