DS 3: Lighting and visibility / Direction indicators
DS 3 2016-2026 Owners Manual
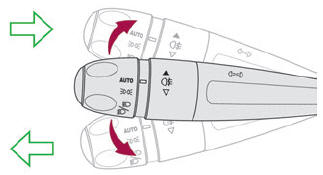
- Left or right: lower or raise the lighting control stalk, beyond the point of resistance.
 If
you keep the direction indicators on for
more than 20 seconds, the volume of the
audible signal will increase if the speed is
above 50 mph (80 km/h).
If
you keep the direction indicators on for
more than 20 seconds, the volume of the
audible signal will increase if the speed is
above 50 mph (80 km/h).
Three flashes
- Press briefly upwards or downwards, without going beyond the point of resistance; the direction indicators will flash 3 times.
Parking lamps
(Depending on version)
Vehicle side marking by lighting the sidelamps on the traffic side only.
- Within one minute after switching off the ignition, operate the lighting control stalk upwards or downwards, depending on the side of the traffic (e.g. when parking on the right, push the lighting control stalk down to light up on the left).
This is confirmed by an audible signal and the lighting of the corresponding direction indicator lamp on the instrument panel.
- To switch off the parking lamps, return the lighting control stalk to the central position.
 Daytime running lamps / Sidelamps
The front and rear lamps light up automatically
when the engine starts.
They provide the following functions:
Daytime running lamps (lighting control stalk in
the "AUTO" position with adequate light level)...
 Automatic illumination of headlamps
With the lighting control stalk in the “AUTO”
position and if a low level of exterior brightness
is detected by the rain/sunshine sensor, the sidelamps and dipped beam headlamps
are
switched on automatically, without any action on
the part of the driver...
Other information:
DS 3 2016-2026 Owners Manual: First steps
With the engine running, a press mutes the sound. With the ignition off, a press turns the system on. Increase or decrease the volume using the thumbwheel on the left-hand side. To access the menus, press this button on the touch screen. Press the back arrow to go back a level...
DS 3 2016-2026 Owners Manual: Telephone
Pairing a Bluetooth® telephone The services available depend on the network, the SIM card and the compatibility of the Bluetooth devices used. Consult the telephone user guide and the service provider to check which services are available. The Bluetooth function must be activated and the telephone configured as "Visible to all” (in the telphone settings)...
Categories
- Manuals Home
- 1st Generation DS 3 Owners Manual
- 1st Generation DS 3 Service Manual
- ISOFIX child seats
- SCR system
- Headlamp beam height adjustment
- New on site
- Most important about car
Identification markings
Various visible markings for vehicle identification and vehicle search.
Copyright © 2026 www.ds3manuals.com