DS 3: Digital instrument panel / Choosing the display mode
DS 3 2016-2026 Owners Manual
In each mode, specific types of information are displayed on the instrument panel.
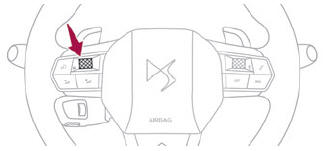
Turn the thumbwheel on the left of the steering wheel to display and scroll through the various modes on the instrument panel.
Press the thumbwheel to confirm the mode. If you do not press the thumbwheel, the selected display mode is automatically applied after a few moments.
Display modes
- "DIALS": standard display of analogue and
digital speedometers, total distance recorder and:
- fuel gauge, coolant temperature indicator and rev counter (Petrol or Diesel).
- battery charge indicator and power indicator (Electric).
- "NAVIGATION": specific display, showing current navigation information (map and instructions).
- "DRIVING": specific display, showing information relating to active driving aid systems.
- "ÉNERGIE": specific display, showing a visual representation of the vehicle’s energy flows (Electric).
- "PERSONAL 1"/"PERSONAL 2": displays the information selected by the driver in the centre of the instrument panel.
 Customising the instrument panel
Depending on version, the appearance of the
instrument panel may be customisable (colour
and/or display mode).
Display language and
units
When travelling abroad, the speed must
be shown in the official units of the country
you are driving in (mph, miles or km/h, km)...
 Configuring a "PERSONAL" display mode
With DS CONNECT RADIO
Press Settings in
the banner of the
touch screen.
Select "Configuration".
Select "Instrument panel
personalisation".
With DS CONNECT NAV
Press Settings in
the banner of the
touch screen...
Other information:
DS 3 2016-2026 Owners Manual: Automatic lighting systems - General recommendations
The automatic lighting systems use a detection camera, located at the top of the windscreen. Operating limits The system may be disrupted or not work correctly: When visibility conditions are poor (e.g. snowfall, heavy rain). If the windscreen is dirty, misted-up or masked (e...
DS 3 2016-2026 Owners Manual: Identification markings
Various visible markings for vehicle identification and vehicle search. Vehicle Identification Number (VIN), under the bonnet.Stamped on the chassis, near the right-hand front wheel arch. Vehicle Identification Number (VIN), on the dashboard...
Categories
- Manuals Home
- 1st Generation DS 3 Owners Manual
- 1st Generation DS 3 Service Manual
- SCR system
- Use
- Tyre under-inflation detection
- New on site
- Most important about car
Electric motor
Copyright © 2026 www.ds3manuals.com