DS 3: Changing a bulb / Rear lamps
Model with "Full LED" technology lamps
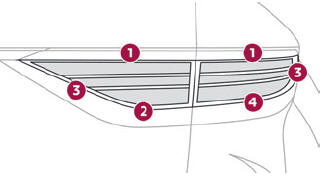
- Sidelamps / Daytime running lamps (LED)
- Reversing lamps (W16W)
- Direction indicators with sequential effect (LED)
- Brake lamps (LED)
Model with halogen lamps
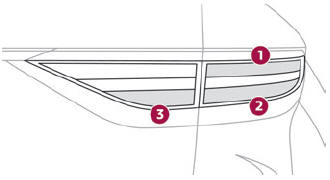
- Brake lamps/sidelamps (W21/5W)
- Direction indicators (WY16W amber)
- Reversing lamps (W16W)
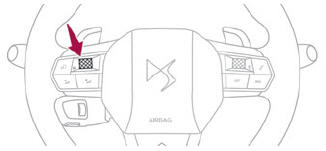
Direction indicators and brake lamps/sidelamps
 Rapid
flashing of a direction indicator
warning lamp (left or right) indicates that
one of the bulbs on the corresponding side has
failed.
Rapid
flashing of a direction indicator
warning lamp (left or right) indicates that
one of the bulbs on the corresponding side has
failed.
 Amber
coloured bulbs, such as the
direction indicators, must be replaced by
bulbs with identical specifications and colour.
Amber
coloured bulbs, such as the
direction indicators, must be replaced by
bulbs with identical specifications and colour.
These bulbs are changed from inside the boot.
- Open the boot.
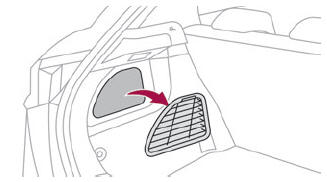
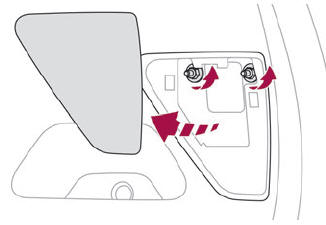
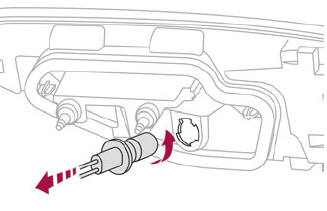
- Remove the access flap on the corresponding side trim, so that the lamp unit fixing screw can be accessed.
- Slacken the lamp unit fixing using a socket wrench.
- Finish slackening it by hand to recover the nut, making sure not to let it drop.
- Remove the lamp unit.
- Unclip the lamp unit connector.
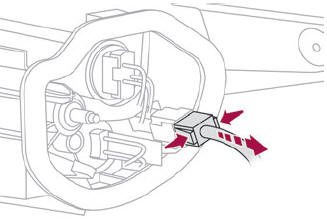
- Squeeze and pull the connector.
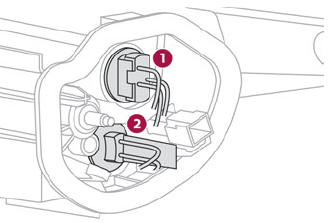
- Brake lamps/Sidelamps
- Direction indicators
Once the lamp unit is disconnected and released, remove the lamp unit so that the bulbs can be changed:
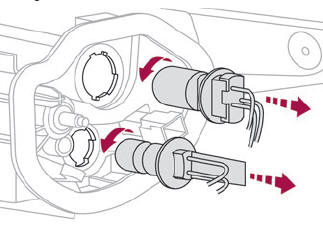
- Turn the bulb holder a quarter turn to the left and pull it out.
- Pull the bulb out and replace it.
 Engage the lamp unit in its guides while
keeping it in line with the vehicle.
Engage the lamp unit in its guides while
keeping it in line with the vehicle.
Tighten sufficiently to ensure sealing, but without damaging the lamp unit.
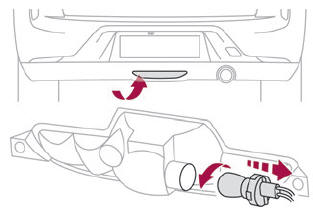
Reversing lamps (tailgate)
- Open the tailgate.
- Remove the access cover and undo the two lamp unit fixing nuts using a socket wrench.
- Squeeze and pull the connector to remove it.
Once the lamp unit is disconnected and released, remove the lamp unit so that the bulbs can be changed:
- Turn the bulb holder a quarter turn to the left and pull it out.
- Replace the bulb.
Foglamp (P21W)
For access, pass your hand under the bumper on the left-hand side.
- Turn the bulb holder a quarter turn to the left and pull it out.
- Turn the bulb a quarter turn to the left and pull it out.
- Change the bulb.
 Front lamps
Model with DS MATRIX LED VISION headlamps
Direction indicators (LED)
Main beam headlamps (LED Matrix Beam
module).
Dipped beam headlamps (LED).
Daytime running lamps (LED)...

Other information:
DS 3 2016-2026 Owners Manual: Driving situations and related alerts
The tables below describe the displays associated with the main driving situations. The display of these alerts is not sequential. ..
DS 3 2016-2026 Owners Manual: General safety recommendations
Do not remove the labels attached in different places on your vehicle. They include safety warnings as well as identification information for the vehicle. For any work on your vehicle, use a qualified workshop that has the technical information, skills and equipment required, all of which a dealer is able to provide. Depending on country regulations, some safety equipment may be compu..
Categories
- Manuals Home
- 1st Generation DS 3 Owners Manual
- 1st Generation DS 3 Service Manual
- Steering wheel adjustment
- Orange warning/indicator lamps
- Alarm
- New on site
- Most important about car
Choosing the display mode
In each mode, specific types of information are displayed on the instrument panel.